Tuesday, March 31, 2015

Microsoft Dynamics CRM Installations, Updates and Documentation

This article lists all the installations, updates and documentation for the currently released MS CRM products.

List included For MS CRM 4.0, MS CRM 2011, MS CRM 2013 and MS CRM 2015

Click Here..

Microsoft Dynamics CRM Installations, Updates and Documentation


Monday, March 30, 2015

Restrict record deletion from sub grid / Associated view based on condition

In CRM you can restrict record deletion by removing delete permission from that entity for particular security role.
Sometimes we need to restrict user to delete record based on some conditions.
You can do by customizing delete button command, and adding some JavaScript functions. 
More tricky when we don't want to allow delete child record based on parent condition. 

Suppose you have two custom entities, say Course and Students. 
One course might have multiple Students. 
Relationship between Course and Students is 1: N. 
To show students who attending course, there is a sub-grid on Course form. 


From this Sub Grid students will be added and removed from Sub grid.
But there is requirement that students cannot remove their names before 5 days of course.
In this case we cannot remove user's delete permission from Student entity. But we can add some logic to restrict delete when course deadline meets.


 Here are steps to achieve this; we need one JavaScript web resource and Ribbon workbench.


1.     First Create JavaScript web resource in customization solution.
I have new_student.js JavaScript web resource.
In this JavaScript add following code


function RestrictDeleteFromSubgrid() {
    var today = new Date();
    var courseStartDate = Xrm.Page.getAttribute('new_startdate').getValue();

    var millisecondsPerDay = 1000 * 60 * 60 * 24;
    var millisBetween = courseStartDate.getTime() - today.getTime();
    var NoOfdays = millisBetween / millisecondsPerDay;

    if (NoOfdays < 5) {
        alert('You cannot remove Student. Course is starting in ' + NoOfdays);
        return false;
    } else {
        return true;
    }

}

2.     Open Student Entity customization in Ribbon workbench.
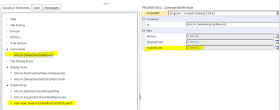
3.     Select Delete button from Sub grid, and right click – Customize command


4.     Now Add Enable Rule


Give proper name to Enable Rule
5.     Add steps to newly created enable rule
6.     Need to add Custom JavaScript Rule


7.     For the Custom JavaScript rule set
Default : True
Function Name: RestrictDeleteFromSubgrid
InvertResult: False
Library: $webresource:edm_student.js


8.     Add Enable rule to delete button command


9.     Publish Customization using Ribbon Workbench.

10.  Now if course is not starting in 5 days, CRM will allow to delete record.

11. When course is starting in 5 days, then 

You can use same technique for Remove button also.. (when N:N relationship).

If you don't want to allow delete from  sub grid but wants to allow from Associated view.

We need to add one Parameter to JavaScript function, and modify above function as 

function RestrictDeleteFromSubgrid(callingGrid) {
    var today = new Date();
    var courseStartDate = Xrm.Page.getAttribute('new_startdate').getValue();

    var millisecondsPerDay = 1000 * 60 * 60 * 24;
    var millisBetween = courseStartDate.getTime() - today.getTime();
    var NoOfdays = millisBetween / millisecondsPerDay;

    if (NoOfdays < 5) {
        if (callingGrid.get_id() != 'crmFormProxyForRibbon') {
            alert('You cannot remove Student. Course is starting in ' + NoOfdays);
            return false;
        }
       else 
        return true;
         
    } else {
        return true;
    }

}

you will get calling Grid Id as "crmForm" for Form sub grid and "crmFormProxyForRibbon" for associated view grid. 

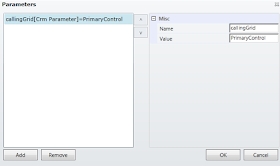
and pass this parameter from delete button enable rule.


Add Crm Parameter
 Name: callingGrid
Value: PrimaryControl

Save and publish your customization.. 

Hide SubGrid '+' / New Button button based on Parent status

Hide child  records sub grid + or Add New button

Some time we need to hide  '+' button or Add New button for child record grid..


You can do this by adding enable rule for + or Add New Button.

1. Open Child record customization in Ribbon workbench

2.  Select Entity so that we will able to modify command definition.

3. In Sub Gird, select + Add New {0} Button, right click and select Customize Command


4.  Add New Enable Rule


5. For Enable Rule.. Add steps, and select Custom JavaScript Rule

6. Set Custom rule properties as 
Default : true
Function Name: DisableSubGridNewButton
Invert Result : False
Library: JavaScript web resource where you added DisableSubGridNewButton function 
Parameters : None. 


JavaScript DisableSubGridNewButton Function 

-- When Form is ready only then hide +new or Add new Button for child records.
function DisableSubGridNewButton() {
    if (Xrm.Page.ui.getFormType() == 3) // Read Only
        return false;
    else
        return true;
}


-- based on Some values on Form

function DisableSubGridNewButton() {
    var IsMarried = Xrm.Page.getAttribute('new_status').getValue();

    if (IsMarried == 70000001) //un marriged
        return false// Hide button
    else
        return true//Show button
}


7. Add this enable rule to button Command


8. Save and Publish Customization.


Thursday, March 26, 2015

Create Entity and bulk Attribute with Data Import in MS CRM

In MS CRM when wants to create entity with more attributes, easy option is data Import tool.
In CRM you can create entity and attributes with Data Import tool.
To create entity with Data Import tool

1. Create Excel file with all required attributes in it.

Keep First Column as Attribute Name and enter values with respective data type. 


If there are any pick list columns and want to create all values also, and then need to add those many row in excel—each row one pick list value.


2.  Save this Excel file as CSV file.

3. Now Open CRM Data Import wizard and upload csv file created.

4. Click Next, if CSV file with comma (,) as Field delimiter and Quotation mark (“) as Data delimiter, then no need to change delimiter settings, Otherwise settings change as per CSV.
In Delimiter settings check First row contains Columns Headings option.


5. In Next screen select Default (Automatic Mapping) and click next

6. Here to create new entity need to select “Create New” Option in Action, Enter Record Type Name, plural Name and Primary Field


 Once all information entered new Entity Name will be shown in Microsoft Dynamics CRM record Type.


      7. Click next, now you need to Create a map attributes.

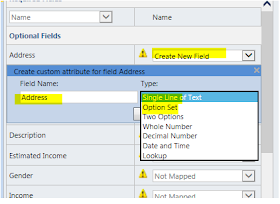
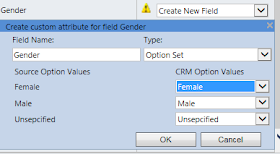
 8. For Each Source Field, select Action – Create New Field option
       
     9. Enter Attribute name, if it is different from CSV file, and select Appropriate Data type.
Text: 

Option Set:


Look up:


Two options:


10.  Once data type and attribute entered this field is shown as mapped.


11. Repeat same process for all other attributes.

12. Once all attributes are mapped, Click Next and start importing.

13. CRM will create New Entity and Attributes and then starts importing data.

When mapping any lookup values, you have to map with unique column in parent entity, otherwise that record will not be imported and error will be thrown. 


Once Data Imported.. you will have Entity with attributes and Data also.. 


Wednesday, March 25, 2015

Access Quick View Form values in JavaScript

Generally if want to access any control or attribute in CRM form script you will use control or attribute name.. For Quick form it is little bit complicated.

If I have Quick form for custom entity new_manufacture, and I added this quick form in new_car entity form.

To access new_manufacturer quick form in car entity form I need to use Quick form name, entity name and attribute name to get value.

To access in JavaScript Quick view, control name should be like
QuickFormname_QuickFormname_EntityName_AttributeName


My Quick Form name is : manufactureQuickView
Entity Name : new_manufacture
Attribute: new_Country

if (Xrm.Page.getControl('manufactureQuickView_manufactureQuickView_new_manufacture_new_Country') != null)
{
            var manfCountyctrl = Xrm.Page.getControl('manufactureQuickView_manufactureQuickView_new_manufacture_new_Country');
            var country = manfCountyctrl.getAttribute().getValue();


        }


Tuesday, March 24, 2015

Show Parent and child together..MS CRM view sorting without column in view

MS CRM allows view to be sorted by columns which are in view only.. but some time we don't want to show column in view but want to sort view by that column.


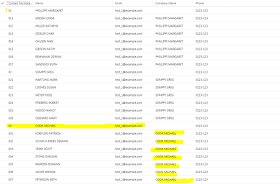
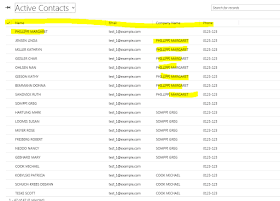
I have a situation in contact view.. I have contacts who has child contact records and in view I want to show parent and child contact records together.


For this I added one column in contact entity - Contact number (text), and I am numbering contacts are like
1. Parent - 01
   Child 1 - 011, child 2 - 012
2. Parent 02
   Child 1 - 021, child 2 - 022, Child 3 - 023

I added this contact number column in my view and then able to sort as per requirement.


But customer don't want to see the contact number column in grid, but wants the same sorting..

To achieve this I exported contact entity customization. and looked into Saved query for this view.
Saved query has layout xml and fetchxml.

First I removed Contact number column from layout xml.

<layoutxml >
  <grid name="resultset" object="2" jump="fullname" select="1" icon="1" preview="1">
    <row name="result" id="contactid">
      <cell name="new_contactnumber" width="300" / >
      <cell name="fullname" width="300" / >
      <cell name="emailaddress1" width="150" / >
      <cell name="parentcustomerid" width="150" / >
      <cell name="telephone1" width="125" / >
    </row>
  </ grid>

</ layoutxml>

Then I looked at fetch xml, it has order node..

<fetchxml>
  <fetch version="1.0" output-format="xml-platform" mapping="logical" distinct="false">
    <entity name="contact">
      <attribute name="fullname" / >
      <attribute name="parentcustomerid" / >
      <attribute name="telephone1" / >
      <attribute name="emailaddress1" / >
      <order attribute="fullname" descending="false" / >
      <filter type="and">
        <condition attribute="ownerid" operator="eq-userid" / >
        <condition attribute="statecode" operator="eq" value="0" / >
        <condition attribute="createdon" operator="today" / >
      </filter>
      <attribute name="new_contactnumber" / >
      <attribute name="contactid" / >
    </entity>
  </ fetch>

</ fetchxml>

I changed this order node as

      <order attribute=" new_contactnumber " descending="false" / >

Saved customization and imported back to CRM.. and Published customization..
Now my view is  showing same sorting and no contact number column in it..