Monday, October 17, 2016

Restrict or Change Number of products in Bundle

In MS CRM you can create bundle to sell different products together. 
You can add maximum  2,147,483,647 products into single bundle. 

MS CRM has default setting to create bundle with 15 products. 

Maximum number of products in bundle setting is specified in System settings, sales tab. 


When you want to restrict number of products in single bundle, need to change this setting as per requirement, Once number of products in bundle are reached with limit specified in settings, MS CRM will throw error message as 


and you will not able to add more products into bundle. 


Friday, October 14, 2016

Personal options in MS CRM system

In MS CRM each user can set personal options, which will be used in different places in CRM application.

To set personal options, user needs to go to options as shown below screen

In personal Option page, there are different tabs, which will allow user to set different options. 
  • General 
General tab has some basic setting like setting landing page, records per page, timezone, currency etc.


  • Select your home page and settings for Get Started panes

               To set landing page in CRM application. When user logged in into CRM system, which page user will see first. This will be set using this option.  User will specify which default pane and default tab, based on selected default pane and default tab user will be landed when logged in to CRM system. 
  • Set the number of records shown per page in any list of records

In CRM views / list how many records wants to see per page. Default option is 50, but user can 25, 50, 75, 100 and 250 records per page. 
  • Select the default mode in Advanced find
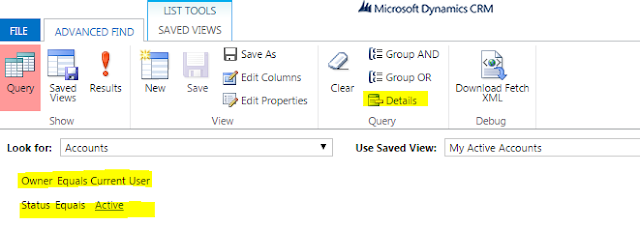
There are two different modes of Advanced find- Simple and Detailed, default option selected is Simple.  When user opens advanced find from any view/list, which has filters based on default mode set here, advanced find will show detailed filters. 

when advanced find mode = Simple , then advanced find will looks like 

when advanced find mode = Details then it looks like
  • Set the time zone you are in
Time zone that user wants to display for his current region. 
If you are using MS CRM for outlook, user need to set same time zone as outlook otherwise there will be some issue in mismatch in date and times, and might be cause problem in synchronizing data between CRM and outlook.  
  • Select a default Currency 
MS CRM supports multiple currencies, user can set default currency, so that when creating any records where currency is required, currency will automatically set based on selected value. 
If there is no currency selected in personal options, then organizations default currency will be used. e.g. if you are working for multi national company, and has offices in different country, and selling products in local currency. So when user from India, selling product in India, currency should be set to INR, instead of USD, other wise user need to change currency value each time when creating any sales records. 
  • Support high contrast settings
user can enable high contrast, if user is using high contrast setting for browser or operating system. 
  • Set the default country/ region code
Enable country/region code prefixing : Select this check box to enable the default calling code for your region.
Country/Region Code Prefix: Enter the value of your region’s calling code in the text box. For example, enter +1 for the United States.

  • View your user information
Link to view details about user. This link will open CRM systemuser entity form to show current user details.
  • Synchronization 
User can set preferences when data is synchronized between MS Dynamics CRM and Outlook or Exchange. 
User can view / manage online / offline filters, as well as view or manage synchronized filed. 
Only a system administrator can change the synchronizing fields.
  • Activities 
User can set default calendar view and work hours in this tab.
  • Default View
User can change default Calendar view to Day, Week or Month. 
  • Set your default work hours
User will set his default work hours.
  • Formats
User can set Number, currency , Time, date formats from this page. Based on formats selected by user, data will be represented to user. 
User can select any predefined formats commonly used in different countries, or based on his preferences, user can customize formats. 
 
  • Email Templates 
User can create or modify personal email templates and user can use those when sending emails to customers. 
Email templates creation option is based on user security role. 
  • Email Signatures 
User can create multiple signatures, which will be added to email, when sending to customer. 

For more detail information about email signature.

  • Email
  • Select whether other users can send email for you
You can allow other CRM users to send emails on your behalf. 
When you are using some common workflow to send emails or always wants to send all emails from some particular user, then you can set this option. 

Important: If you choose this option, other Microsoft Dynamics CRM users will be able to send email messages with or without your knowledge that display you as the sender.
  • Select the email messages to track in Microsoft Dynamics CRM

Track : Select the email messages that you want to automatically track in CRM.
               Options:
                            All Email messages
                            Email messages in response to CRM email
                            Email messages from CRM Leads, Contacts and Accounts
                            Email messages from CRM records that are email enabled

             Configure Folder Tracking Rules : Set up folders to automatically track incoming email.

Automatically create records in Microsoft Dynamics CRM
Create : Select this option to allow CRM to create leads or contacts automatically from the information in tracked email messages.
View your Mailbox : Click this link to see your mailbox details.
  • Privacy 
User can set options about how to notify microsoft when error occurces in CRM. 
  • Languages
If your organization has installed multiple languages, then user can set preferred language for user interface  and help.
Default Language is English, when other language is installed, system administrator need to make sure all contains / labels are translated to all other available languages. 
    

Tuesday, October 4, 2016

Sub Grid client side script methods


In MS CRM 2016, and Online there are new subgrid related methods added for client side scripting
Events
            For subgrid now you can add event handler for OnLoad. OnLoad event runs every time when subgrid refreshes or when clicking on column heading.
OnLoad Events are addOnLoad and RemoveOnLoad
To use addOnLoad or RemoveOnLoad you need to get object of grid and then add event handler.
Xrm.Page.getControl("Contacts").addOnLoad(myContactsGridOnloadFunction);
Xrm.Page.getControl("Contacts").RemoveOnLoad(myContactsGridOnloadFunction);

Access Data from grid
There are some methods to access data from grid.
getRows – gives all rows in the grid
getSelectedRows – gives only selected rows in grid
getTotalRecordCount – gives total number of records in grid.

getRows data

getSubGridRowData: function () {
        //Get Sub Grid object
        var carsubGrid = Xrm.Page.getControl("Cars").getGrid();

        //Get sub grid rows
        var gridRows = carsubGrid.getRows();

        //loop through each row to get values of each column
        gridRows.forEach(function (row, i) {
            var gridColumns = row.getData().getEntity().getAttributes();
            //loop through each column in row
            gridColumns.forEach(function (column, j) {
                var atrName = column.getName();
                var atrValue = column.getValue();
            });
        });

    }

getSelectedRows data

getSelectedSubGridRowData: function () {      
        //Get Sub Grid object
        var carsubGrid = Xrm.Page.getControl("Cars").getGrid();

        //Get sub grid rows
        var gridRows = carsubGrid. getSelectedRows();

        //loop through each row to get values of each column
        gridRows.forEach(function (row, i) {
            var gridColumns = row.getData().getEntity().getAttributes();
            //loop through each column in row
            gridColumns.forEach(function (column, j) {
                var atrName = column.getName();
                var atrValue = column.getValue();
            });
        });

    }

GetTotalRecordCount in grid

getSubGridRecordCount:function()
    {
        var carsubGrid = Xrm.Page.getControl("Cars").getGrid();
        var TotalRecordCount = carsubGrid.getTotalRecordCount();
    },

GridEntity details
To get grid entity details you can use
1.      getEntityName – gives logical name for the record in the sub grid row
2.      getEntityReference - Set the firstEntityType variable to an entity reference for the first row in the Contacts subgrid.
3.      getId – returns GUID for the record in subgrid row
4.      getPrimaryAttributeValue - Returns the primary attribute value for the record in the row.

getGridEntityDetails: function () {
        //Get Sub Grid object
        var carsubGrid = Xrm.Page.getControl("Cars").getGrid();

        //Get sub grid rows
        var gridRows = carsubGrid.getRows();
        gridRows.forEach(function (row, i) {

            //EntityName
            var entityName = row.getData().getEntity().getEntityName();

            //Entity reference - return type is Lookup object
            var entityReference = row.getData().getEntity().getEntityReference();

            //Record Guid
            var recordId = row.getData().getEntity().getId();

            //Primary Attribute, e.g. for account primary attribute is name, it will return value for name attribute in grid row
            var PrimaryAttributeValue = row.getData().getEntity().getPrimaryAttributeValue();
        });

    },

Subgrid view methods
If the subgrid control is not configured to display the view selector, calling the ViewSelector methods will throw an error.
1.      getCurrentView – gives current view details , it is lookup object, contains Id and name of saved query entity or user query entity.
2.      setCurrentView – set current view to subgrid, it is lookup object of SavedQuery entity or user query entity.
3.      isVisible - Use this method to determine whether the view selector is visible.

gridViewSelectorMethods: function () {
        var carsubGrid = Xrm.Page.getControl("Cars").getViewSelector();

        //gives current view
        var currentView = carsubGrid.getCurrentView();

        //set current view
        var myCurrentCars = {
            entityType: 1039, // SavedQuery
            id: "{3A282DA1-5D90-E011-95AE-00155D9CFA02}",
            name: "My Cars"
        }
        //Set the view using myCurrentCars
        Xrm.Page.getControl("Cars").getViewSelector().setCurrentView(myCurrentCars);

        // is Visible
        var viewSelectorIsVisible = Xrm.Page.getControl("Cars").getViewSelector().isVisible();
    },


More details about grid methods and functions