In CRM you can restrict record
deletion by removing delete permission from that entity for
particular security role.
Sometimes we need to restrict user to delete record based on some
conditions.
You can do by customizing delete button command, and adding some
JavaScript functions.
More tricky when we don't want to allow delete child record based
on parent condition.
Suppose you have two custom entities, say Course and
Students.
One course might have multiple Students.
Relationship between Course and Students is 1: N.
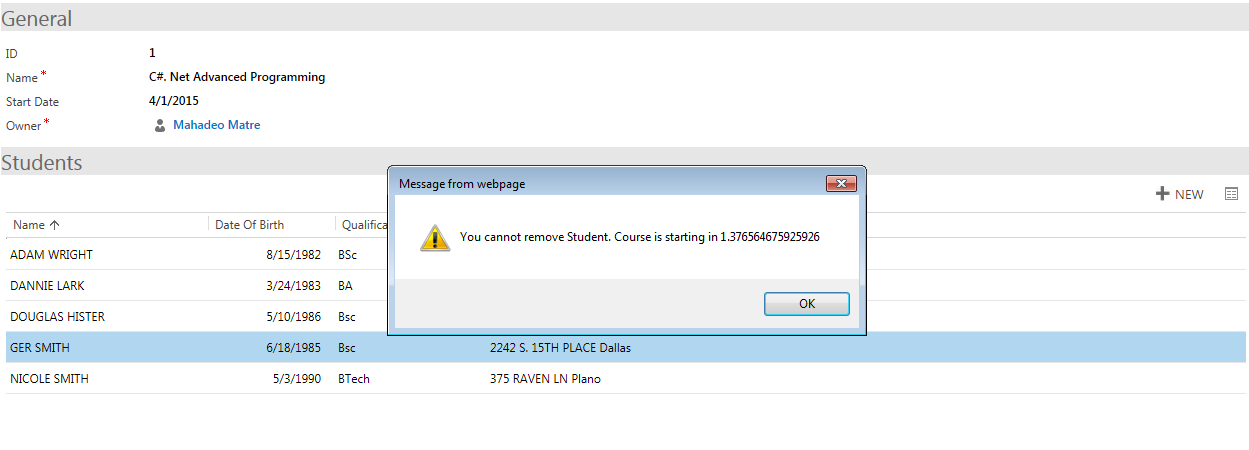
To show students who attending course, there is a sub-grid on
Course form.
From this Sub Grid students will be added and removed from Sub
grid.
But there is requirement that students cannot remove their names
before 5 days of course.
In this case we cannot remove user's delete permission from
Student entity. But we can add some logic to restrict delete when course
deadline meets.
Here are steps to achieve this;
we need one JavaScript web resource and Ribbon workbench.
1.
First Create JavaScript web resource in customization solution.
I have new_student.js JavaScript web resource.
In this JavaScript add following code
function RestrictDeleteFromSubgrid() {
var today = new Date();
var courseStartDate = Xrm.Page.getAttribute('new_startdate').getValue();
var millisecondsPerDay = 1000 * 60 * 60 * 24;
var millisBetween = courseStartDate.getTime() -
today.getTime();
var NoOfdays = millisBetween / millisecondsPerDay;
if (NoOfdays < 5) {
alert('You
cannot remove Student. Course is starting in ' +
NoOfdays);
return false;
} else {
return true;
}
}
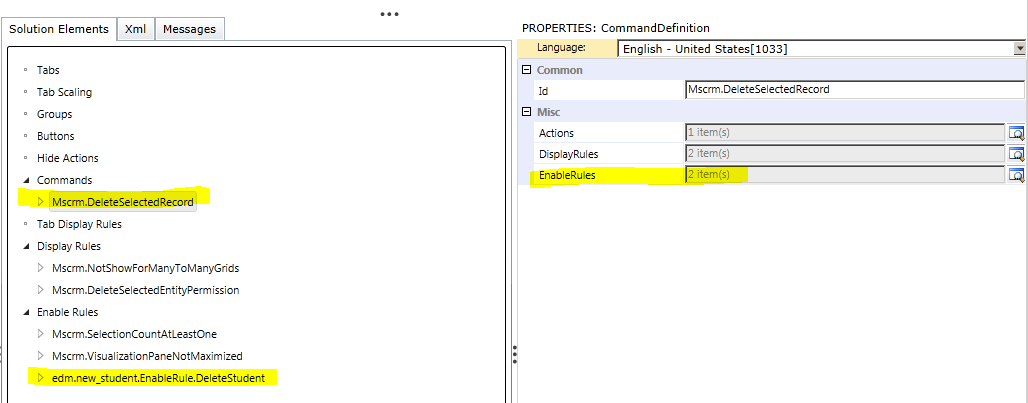
2.
Open Student Entity customization in Ribbon workbench.
3.
Select Delete button from Sub grid, and right click – Customize command
4.
Now Add Enable Rule
Give proper name to Enable
Rule
5.
Add steps to newly created enable rule
6.
Need to add Custom JavaScript Rule
7.
For the Custom JavaScript rule set
Default : True
Function Name: RestrictDeleteFromSubgrid
InvertResult: False
Library: $webresource:edm_student.js
8.
Add Enable rule to delete button command
9.
Publish Customization using Ribbon Workbench.
10. Now if course is not
starting in 5 days, CRM will allow to delete record.
11. When course is starting in 5 days, then
You can use same technique for Remove button also.. (when N:N relationship).
If you don't want to allow delete from sub grid but wants to allow from Associated view.
We need to add one Parameter to JavaScript function, and modify above function as
function RestrictDeleteFromSubgrid(callingGrid) {
var today = new Date();
var courseStartDate = Xrm.Page.getAttribute('new_startdate').getValue();
var millisecondsPerDay = 1000 * 60 * 60 * 24;
var millisBetween = courseStartDate.getTime() -
today.getTime();
var NoOfdays = millisBetween / millisecondsPerDay;
if (NoOfdays < 5) {
if (callingGrid.get_id() != 'crmFormProxyForRibbon') {
alert('You cannot remove Student. Course is starting in ' + NoOfdays);
return false;
}
else
return true;
} else {
return true;
}
}
you will get calling Grid Id as "crmForm" for Form sub grid and "crmFormProxyForRibbon" for associated view grid.
and pass this parameter from delete button enable rule.
Add Crm Parameter
Name: callingGrid
Value: PrimaryControl
Save and publish your customization..